Sitefinity and IdentityServer
So the other day I was told at work "we need to build a new app and we don't want users to sign in with a different username and password". Yep, I totally agree with that statement - it's not the 2000s anymore (the noughties anyone?). Our church has gotten comfortable with their current name and password combo (which comes from Ministry Platform), so that was that. And it would make for terrible UX to avoid Single Sign On (SSO) in our situation.
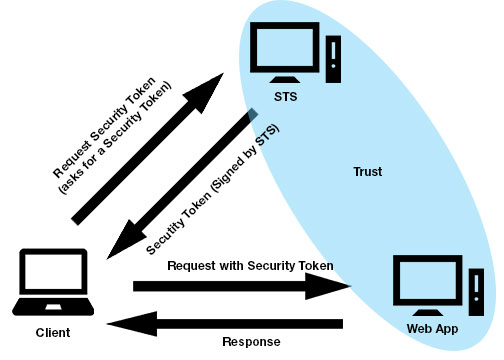
I found a great resource from Thinktecture called IdentityServer. If you haven't heard about IdentityServer yet, get on the band wagon. It's a great open light-weight security token service (STS) built using .NET 4.5, ASP.NET MVC4, WCF and Web API. You can quickly get enterprise-level SSO scenarios up and running. It's also quite easy to add custom claims and membership management.
If you're unsure about what an STS is, you can get more info here. Either way, here's a quick diagram:

We run our main site on Sitefinity. So the idea is to get Sitefinity to work with IdentityServer so we can have future web apps accept the same security token issued for Sitefinity and log them in, i.e. Single Sign On. I know... I know... If you're familiar with Sitefinity at all you may be asking, why don't you just use one of Telerik's provided solutions? There's a few problems with that. First problem is we don't use Active Directory in our Sitefinity instance at all and that's one of the exact out-of-the-box solutions they provide. And I also wasn't about to spin up a Sitefinty instance as a STS by itself. That just seemed like a bad idea, especially if I want to get other non-Sitefinity apps to work with it. Second, while I could spend a lot less time modifying their provided solution to work with our custom membership provider, I wanted something that would be more universal, more future-proof (if there is such a thing), more open. IdentityServer has a lot in it in terms of supported protocols and tokens. And it's being actively developed. And it's open. So there. Boom.
So I started my journey down to Sitefinity and Custom STS land. And it was fun. Until I found out that Sitefinity uses a modified version of the Simple Web Token (SWT) protocol. Time to go to the mattresses.
I forked IdentityServer on Github, and basically merged the STS code that's available from one's Telerik account under the Sitefinity downloads section with IdentityServer. It's not the prettiest thing ever, but it works. Sitefinity is not only using a modified SWT, but it also requires a slightly different order of events. Rather than reading the SWT format provided by IdentityServer and then verifying the token, it requires that the token be encoded in the url and the request on the STS be redirected back to the Sitefinity instance it was orginated from. Honestly, I don't know if this is good practice or not, but it does seem a little odd to be implemented that way.
Okay enough background, let's talk about how to get it done.
Get the latest bits from my github account here.
Create a new Sitefinity project and log in and add at least one user other than the administrator. In order to use the backend, Sitefinity will need to match the username with one in whatever membership provider you're using. So if you're using the default one that comes with Sitefinity, you'll need to create a user on both ends with the same name. Remember the user name that you added.
In the SecurityConfig file of your Sitefinity application (/App_Data/Sitefinity/Configuration/SecurityConfig.config) add the following line:
The key must be a string of hex characters and "Your Site ID" must be the unique URI of your STS/IdentityServer you entered in the general settings area.<add key="<Your Hex key here>" encoding="Hexadecimal" membershipProvider="Default" realm="<Your Site ID>"/>In the web.config file of your Sitefinity application, locate the "wsFederation" element & change the issuer attribute to point to your IdentityServer installation:
<wsFederation passiveRedirectEnabled="true" issuer="https://<Your-IdentityServer>/issue/sitefinity" realm="http://localhost" requireHttps="false"/>Install IdentityServer as you normally would. You can find out how to do that by watching this.
Enable the Sitefinity protocol under the "Protocols" section. Sitefinity is considered here as a new "protocol", even though it's more of a modification of an existing one.
Log into your IdentityServer and add a relying party if you haven't already. Be sure to include the port number if your relying party is on localhost. Set up things as usual but in the Symmetric Key field add the Hex key you entered in step 1 - Don't generate one.
Add a user to IdentityServer's user manager with the exact same name you used in step 1. Make sure they are in the IdentityServerUser role. You can always turn that off later if you need to.
Start the relying parting application. Navigate to the Sitefinity backend and you should be redirected to the IdentityServer portal to login. If you're not, make sure the url in the "issuer" field of wsFederation is valid, and that you have the Sitefinity protocol turned on.
Enter your username and password, hit login, and voilà! You're logged into Sitefinity. If you experience a redirect loop, it's because Sitefinity is rejecting the provided token. Make sure that the url in the security config you entered in step one is the exact same as the Site ID field in the General Configuration area of IdentityServer. Also make sure you entered the Symmetric key correctly.
Most likely in a real world scenario you will need a new membership provider at the very least; the above steps are just to get you going.
Tagged with Sitefinity IdentityServer SSO
Hey glad you're here! I'm a developer living in Melbourne, FL. Hope you enjoy some of the topics I discuss here.